Developer Guide
Learn how to integrate Syft into your site and product. This guide covers consent management, auto-capture configuration, visitor identification, and custom event tracking.
Syft automatically captures interactions of your website visitors. These actions include page views, link clicks, and form submissions. The default out-of-the-box behavior should get you started with minimal configuration. However, you will want to customize what data you collect and when, especially from a data privacy perspective.
This guide shows you how to integrate and customize data collection using the Syft SDKs and tracking script. It is primarily aimed at web and full-stack developers.
Customizing Data Collection
Respecting User Consent
Syft's data collection is designed to respect cookie consent as required by regulations such as CCPA and GDPR. Syft integrates with Consent Management Platforms (CMPs) that provide cookie banners such as CookieBot. When a CMP is installed on the site with TCF enabled, Syft's tracking script will automatically read and respect the user consent string.
If you use a custom cookie banner instead of a CMP, you can integrate Syft with it using our SDK. Syft's tracking is default "opt-in", which means that Syft will track a visitor unless you explicitly tell it not to. To configure Syft to be default "opt-out", so that you wait until the visitor grants you consent, you can modify the Syft tracking script to disable tracking when initialized:
// Disable tracking on initialization
({ sourceId: "${apiKey}", enabled: false });
If you are loading the script directly from the CDN (e.g. for CSP compliance), you can set the enabled state via a data attribute:
<script
  id="syft-loader"
  src="https://cdn.sy-d.io/syftnext/syft.umd.js"
  data-api-key="{YOUR_API_KEY}"
  data-enabled="false"
/>
.. and then turn the tracking on (or off) when consent is given (or withdrawn):
// explicit call to enable tracking
if (window.syft) {
  syft.enable();
} else {
  // if syft is still not loaded, set syftc variable
  window.syftc = { enabled: true };
}
..
// ..or to disable tracking
if (window.syft) {
  syft.disable();
}
Note: When loading from CDN, window.syft may not be immediately available. Always check for its existence before calling methods.
For a detailed guide, please consult our example repo that shows how to integrate Syft with a consent banner.
Configuring Auto-capture
By default, Syft tracks all behavioral data such as page views, link clicks, and form submissions automatically. However, in some cases, you might want to not capture all these events. For example, you might want to only track custom product events (see next section) or user logins on your 'app' site. In that case, you can disable auto-capture by modifying the tracking code snippet:
// disable automatic capture of all events
({ sourceId: "${apiKey}", autoTrackEnabled: false });
Syft keeps track of visitors' form submissions that include an email address as an input. These are typically lead-gen or sign-up forms on your website. Syft enriches the visitor's identity from the captured email address and associates this identity with their sessions. Syft captures only the visitor's email address and name from the forms. Everything else, including sensitive fields, is ignored.
You can disable Automatic Form Tracking by passing a flag to our SDK..
// disable capture of form submissions
({ sourceId: "${apiKey}", trackFormSubmits: false });
Identifying visitors who sign-up via 3rd-party Systems
Syft identifies visitors that sign-up via 'email forms' automatically. However, it cannot identify them when they sign-up or login using 3rd-party services such as Google or GitHub embedded in your service.
In such cases, you will have to invoke the identify() Syft API in your signup flow to identify the user explicitly. The email and source parameters are required in this API call. Additional optional parameters can be provided to further enrich the user profile.
An example usage looks like this:
syft.identify("visitor@example.com", {
  source: "signup", // the source of identity, valid values are: "signup", "login" or "form_submit"

  // [OPTIONAL fields]
  firstName: "Jennie",
  lastName: "Nichols",
  type: "Product Sign-up",
  title: "VP of Engineering";
});
For a full example, please consult our sample code that integrates this SDK in the auth flow of a NextJS application.
Real-time ICP Detection
Syft enables real-time ICP (Ideal Customer Profile) detection for all website visitors within milliseconds of page load, enabling dynamic personalization for high-value prospects without requiring email identification.
For detailed documentation on configuring and implementing real-time ICP detection, including code examples and best practices, see the Real-time ICP guide.
Publishing Custom Events
In addition to automatically captured events, you can also publish custom events to track specific actions within your product. These events can provide valuable insights into user intent. To publish a custom event, use the track() API call with a unique event name, as shown below:
// Trigger a custom event when the user installs the app
syft.track("app-installed");
You can also send custom events using curl:
curl -H "Authorization: {key}" -H "Content-Type: application/json" -d '{"event_name":"app-installed"}' https://e2.sy-d.io/log > /dev/null 2>&1 &
If available, you can include additional information such as email, first_name, last_name, company, and title along with your custom event.
RB2B Tracking
Syft supports RB2B integration for enhanced visitor identification. To enable RB2B tracking, toggle it on in the Syft app under your source settings. Once enabled, the Syft tracking script URL provided in your snippet will change to include RB2B functionality -- make sure to update the script on your site with the new URL from the app.
If your website enforces a strict Content Security Policy, you will need to use the RB2B-specific CSP directives listed in the CSP section below.
Content Security Policy (CSP) Support
If your website enforces a strict Content Security Policy (CSP), you will need to allowlist Syft's domains to ensure the tracking script works correctly.
Add the directives below that match your configuration.
Without RB2B tracking
- script-src:
https://cdn.sy-d.io - connect-src:
https://*.sy-d.io
With RB2B tracking enabled
If you have RB2B tracking enabled, use these directives instead (they already include the Syft domains):
- script-src:
'self' https://cdn.sy-d.io https://ddwl4m2hdecbv.cloudfront.net/b/ https://b-code.liadm.com/lc2.js https://rp.liadm.com https://idx.liadm.com - connect-src:
'self' https://*.sy-d.io https://pro.ip-api.com https://alocdn.com/c/vn3d8u2u/a/xtarget/p.json https://*.liadm.com https://9xgnrndqve.execute-api.us-west-2.amazonaws.com https://a.usbrowserspeed.com - default-src:
'self' https://*.liadm.com
For users with strict CSP requirements, we recommend loading the script directly from our CDN (as opposed to using an inline snippet). See the Next.js guide for an example.
HubSpot
HubSpot hosted pages manage CSP via Site Settings → Advanced → Content Security Policy. HubSpot already includes 'self' in its base policy, so you only need to add the Syft-specific domains to the appropriate sections:
- Script sources:
https://cdn.sy-d.io - Connect sources:
https://*.sy-d.io
If you have RB2B tracking enabled, add the additional domains from the RB2B directives above to each corresponding section.
Verifying the Syft installation
To verify that the script is correctly loaded and is sending data, in the Chrome browser, open Developer tools, click on the Network tab, and check if calls to the https://e2.sy-d.io/events endpoint are being made. This is where the Syft tracking script and SDK send events to.
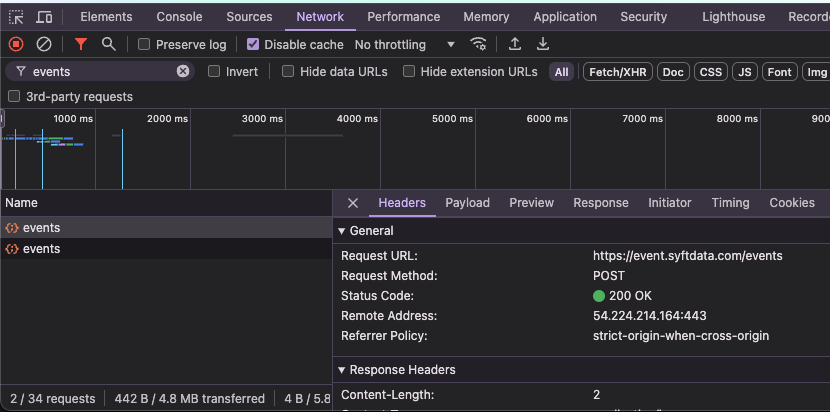
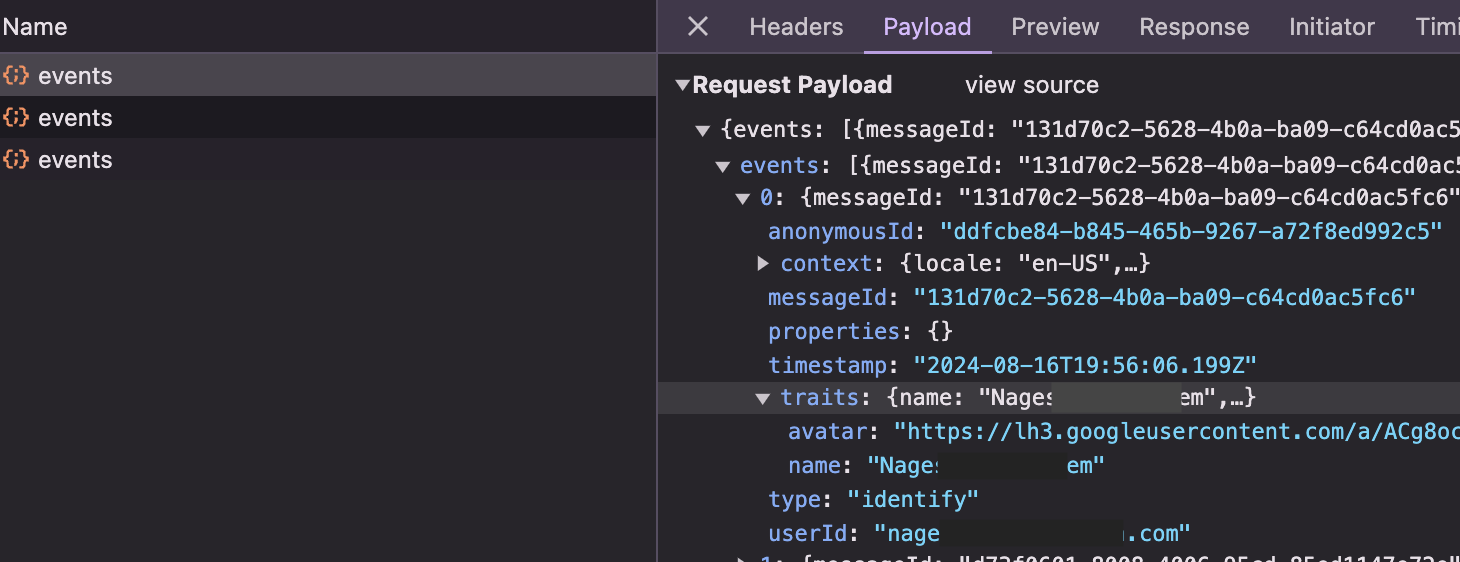
By inspecting the payload of the API calls, you can also verify if users are being identified properly. Make sure there is an event with type identify in the request payload.
Performance
The Syft Javascript snippet is designed to ensure that it doesn't affect the performance and reliability of your website. Specifically,
- The snippet loads asynchronously so that your page load times are unaffected.
- In case of any errors, the snippet fails silently ensuring that no errors are visible to website users.